Welcome to the MilkMachine Project Page!
MilkMachine is a QGIS Python Plugin for creating KML (keyhole markup language) files from GPS data. The code and components developed to support the 250 Miles Crossing Philadelphia project http://www.250miles.net/. MilkMachine will accept raw gps data in .csv format and allows for creation of KML tours, placemarks, models, audio attachment, spatial smoothing/filtering, and time editing. Once editing is complete, files can be exported to .kml or .kmz. An intermediate shapefile (.shp) is produced that will store the coded attribute information. No cow’s milk (or milk of any kind) is produced.
Page Contents
Quick Start
- QGIS (2.4 or above) (required)
- Python SciPy (required)
- Google Earth (optional, but necessary to view .kml)
- VLC Media Player (optional, but necessary of syncing audio files)
For full installation instructions see https://github.com/EdFarrell/MilkMachine. The basic install sequence is that you have QGIS 2.4 (or above) installed (Windows, Mac, Linux). Mac and Linux ship with Python, the Windows version of QGIS will bring along it’s own version of Python. Make sure that SciPy (http://www.scipy.org/install.html) is installed. On Linux, just run this
$ sudo apt-get install python-scipy
On Windows you can use pip
pip install scipy
Now that your dependencies are complete, install MilkMachine into the ~/python/plugins directory for QGIS, if you are grabbing the source from GitHub. If the install worked, you should see the MilkMachine icon in your QGIS toolbar ![]() . Google Earth is compatible on PC, Mac, & Linux (http://www.google.com/earth/), and so is VLC (http://www.videolan.org/vlc/index.html).
. Google Earth is compatible on PC, Mac, & Linux (http://www.google.com/earth/), and so is VLC (http://www.videolan.org/vlc/index.html).
Examples
Input File Format
Before you get started with using MilkMachine, you have to have some GPS data! To use MilkMachine, those data must be stored in a comma separated file (*.csv) and have 5 columns with sequential GPS locations. The columns that must be present (you can have more than these) are;
- date: Date of the location. Can be in these formats; MM/DD/YYYY, DD/MM/YYYY, YYYY/MM/DD
- time: Time of the location. Must be HH:MM:SS, or HH:MM:SS.mmmmmm. mmmmmm is microseconds. See the Python datetime library for full spec (https://docs.python.org/2/library/datetime.html)
- x: Longitude. numeric, geographic coordinates (WGS84)
- y: Latitude. numeric, geographic coordinates (WGS84)
- altitude: Elevation in reference to sea level (could also be to “sea floor”). numeric, meters preferred.
Example 1: Create a .kml file with placemarks
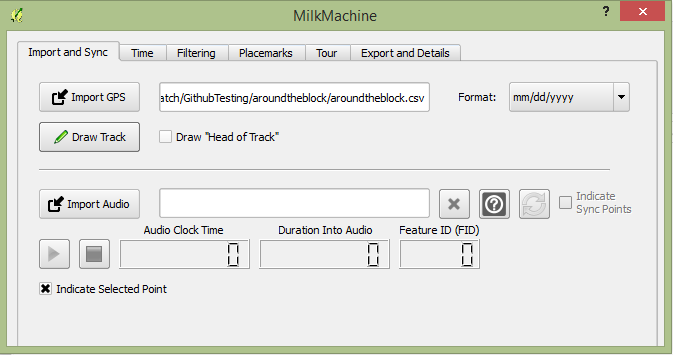
Figure 1. MilkMachine import raw file. The around the block file can be found here https://github.com/EdFarrell/MilkMachine/tree/master/sampledata/aroundtheblock
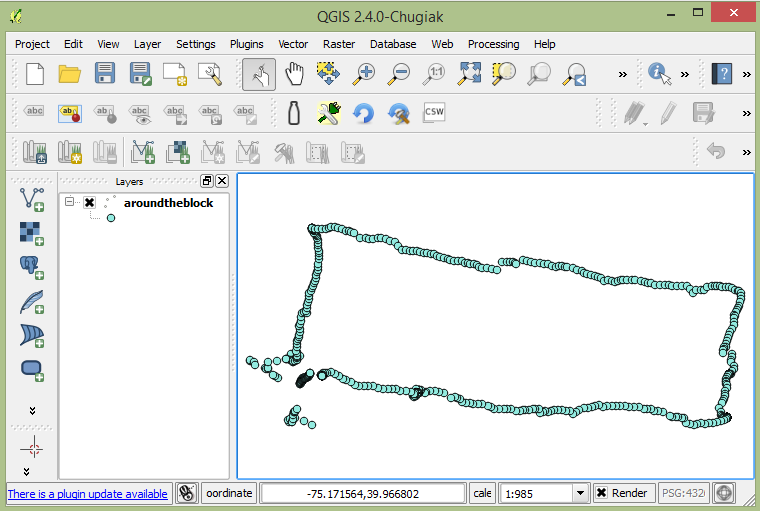
Figure 2. MilkMachine import layer drawn on map canvas
- Import a raw .csv GPS file by clicking the “Import GPS” button (Figure 1) and browsing to your csv file. The file must be formatted properly (see above) and have valid data in each of the rows. Once the file path appears in MilkMachine, click the “Draw Track” button. This will convert the .csv file to an ESRI Shapefile and the Shapefile will be added to the table of contents and the map canvas (Figure 2). The Shapefile is written to the same directory of your .csv file, and named the same. Also, many columns are added to the Shapefile, which will hold the .kml tag value pairs. Now your ready to edit!
- Open up a QGIS edit session on the aroundtheblock layer.
- Select all of the features in the aroundtheblock layer, and make sure that the layer is selected in the table of content. Only features that are selected will be changed by MilkMachine.
- Navigate to the “Placemarks” tab. The aroundtheblock layer should be in the text box. Click the “Edit Points” checkbox (Figure 3). Now you are ready create your placemarks!
- The “Icon Style” options control how the placemark will look. Here, I chose to color my placemark blue. The default placemark is the pushpin, but you can link to any icon. Just add the full URL to the “icon” option. You can also control how the label will look by using the “Label Style” options. Here, I took the defaults so it the labels will appear white. If you don’t want labels at all, just change the scale value to 0. All of these options are taken directly from the the KML elements reference. You can hover over the options in MilkMachine to get an idea of what the field does, or you can go directly to the API reference pages (https://developers.google.com/kml/documentation/kmlreference). Click the “Apply” button to build edit the aroundtheblock layer, this will apply the icon settings.
-
Navigate over to the “Export and Details” tab in MilkMachine. Click the “Export Track” button (Figure 4) and save as “aroundtheblock_basicplacemark.kml” in a directory of your choice.
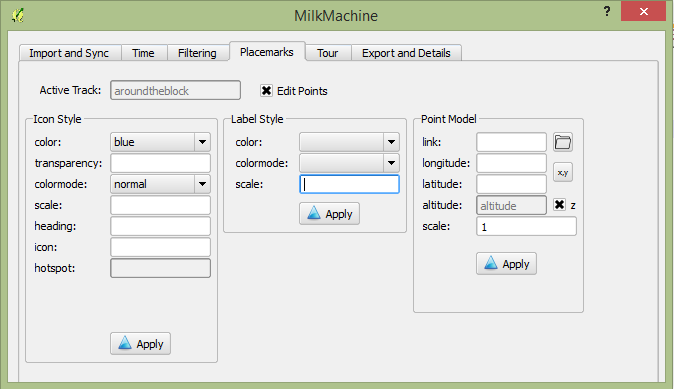
Figure 3. Create placemarks for all of the selected features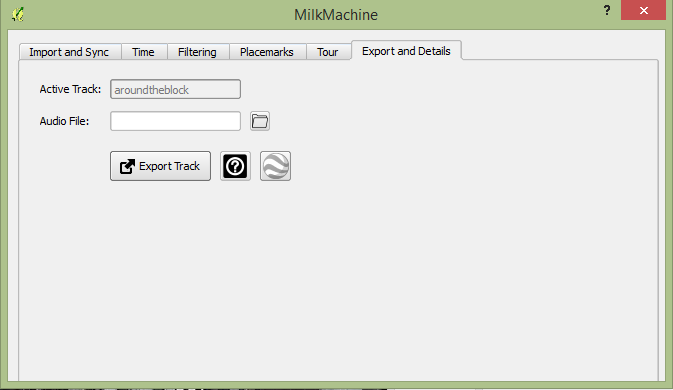
Figure 4. Click the export button to export to .kml. -
Open your newly exported aroundtheblock_basicplacemark.kml file by double clicking it (you must have Google Earth installed). It will launch in Google Earth (Figure 5). You’ll notice that this track is a walk around the block in Philadelphia, PA, and that the placemarks are blue and have white labels. Click on the placemarks to see what time the placemark occured.
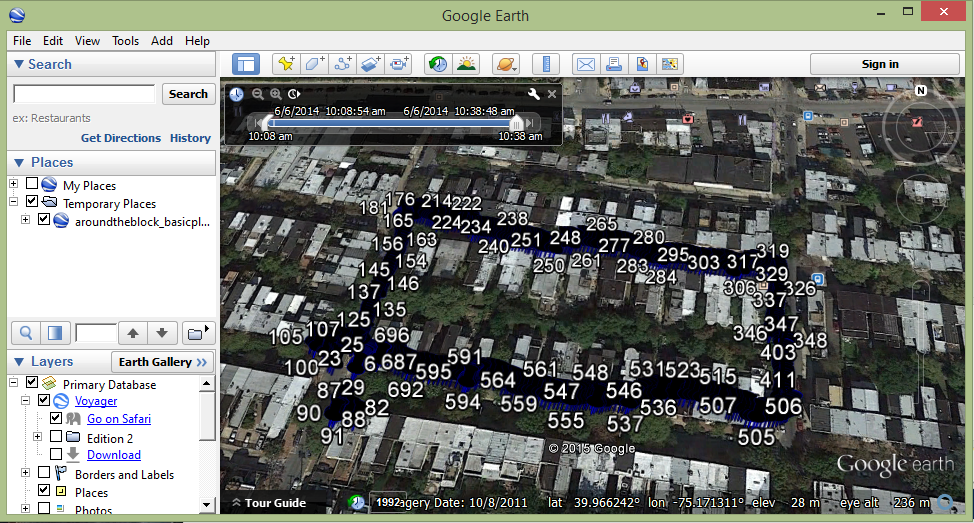
Figure 5. Check out your .kml file in Google Earth. -
Let’s add models to the track! In the Placemarks tab in the Point Model options (Figure 6), click the folder icon for the “link” option and navigate to your custom made .DAE Collada file. Here we will use the one provided in example data that can be found at https://github.com/EdFarrell/MilkMachine/blob/master/sampledata/aroundtheblock/model.dae. Leave the longitude and latitude columns blank (they are used to override the lat/long), and uncheck the “z” checkbox. Put a 1 in for the altitude, which will set the altitude for all of the models to be 1 meter, instead of the altitude that set in the source file. Leave the scale at 1. Click “apply”.
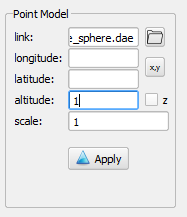
Figure 6. Model settings for gray cube .dae file.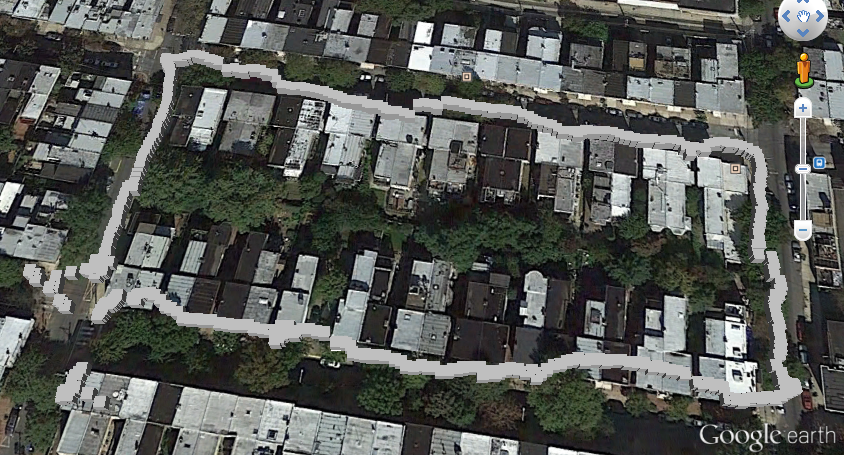
Figure 7. Gray cubes in Google Earth.
Example 2: Create a .kml tour
Creating a Google Earth tour in MilkMachine is easily accomplished by importing a gps file, applying models to the gps locations, then creating the tour in the “Tour” tab of MilkMachine. As noted above, the layer that you are editing in the table of contents must be open for editing in QGIS, and you must “select” the points that will be part of the tour.
MilkMachine supports both Google Earth Camera and LookAt based tours (see KML Camera Documentation). The field names are taken directly from the KML documentation as well as the help (hover over the field for help popup). If you need more explanation of a field, use the KML Reference.
MilkMachine will only accept COLLADA files (.dae) for models. These can be made with software such as SketchUp (http://www.sketchup.com/). Once imported into MilkMachine, the model can be scaled to make it larger or smaller. If you don’t want the models to appear in the tour, give them a “scale” of 0 in the “Placemarks” tab.
Example 2a: Follow Behind Tour
A “Follow Behind” Tour will place 1 KML camera for every GPS point. As the GPS points progress through time, the Camera will follow. The user can control the relative orientation of the Camera using MilkMachine.
- Follow the steps in Example 1 to import gps, and add models. In this example I am using a blue cube found in the sample data directory .
- Remember, in order to edit you must turn editing “on” and “select” the points that will have the tour applied.
- Open up the “Tour” tab an click the “Edit Tour” checkbox to enable the tour fields (Figure 8). Give your tour a name in the “Tour Name” box (this will appear in Google Earth). In the Camera content box choose the “Follow Behind” tab (Figure 8).
- I would like the Camera to follow my points from above, looking down toward the ground. So, I set my altitude to 10 (meters) and the altitudemode to “relativeToModel” since the model has an altitude of it’s own. This will force the altitude of the Camera to always stay 10m above the GPS point. (Figure 9)
- The range is the horizontal distance from the GPS point. Here, I set it to 15m.
- The tilt is the rotation of the camera measured in degrees. 0 degrees tilt would be looking straight down at the ground. A 90 degree tilt would be looking horizontal. A 180 degree tilt would be looking straight up toward the sky. Here is set it to 48 degrees (a right triangle).
- Set the follow angle to be 180 degrees. This will set the Camera directly behind the direction of the sequential GPS points. See Figure 10 for description of follow locations.
- Leave the default smoother number of 10. The heading angle is calculated by averaging the angles between sequential GPS points. The smoother number determines how many points are used in the averaging function. A higher number will give a “smoother” track. (Note: if the GPS is stationary for long enough the heading angle will be zero because there will be no difference in locations between points resulting in no discernible angles, so the angle will default to zero or North).
- Leave the FlyToMode set to “smooth”. This will create a smooth transition between tour points.
-
Leave the “Time Stamp Duration” check box checked. This tells MilkMachine to use the time stamps as the duration of the tour points.
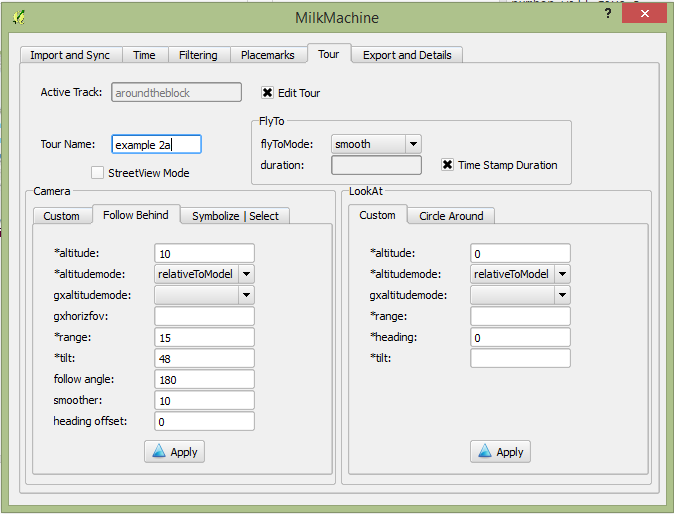
Figure 8. Create a “Follow Behind” tour in Milk Machine.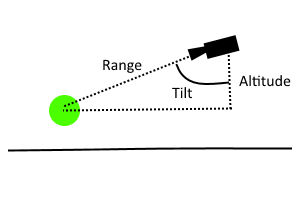
Figure 9. Rotation, in degrees, of the camera around the X axis. A value of 0 indicates that the view is aimed straight down toward the earth (the most common case). A value for 90 for tilt indicates that the view is aimed toward the horizon. Values greater than 90 indicate that the view is pointed up into the sky. Values for tilt are clamped at +180 degrees.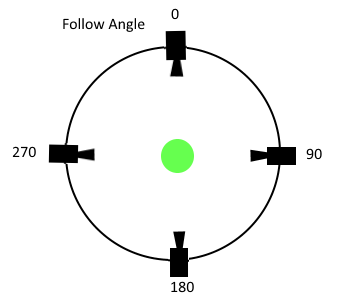
Figure 10. The compass angle of the Camera relative to the point (0-360 degrees). If the follow angle is 0, then the camera will be in front of the model. If the follow angle is 90, then the camera will be starboard of the model. If the follow angle is 180, then the camera will be behind (following) the model. If the follow angle is 270, then the camera will be port of the model. - Click “Apply” to apply all of your Tour settings. You will see a blue success message above the map canvas in QGIS if applied successfully.
- Go over to the “Export and Details” tab in MilkMachine and click the “Export Track” button. Save this file as “example2a.kml”.
-
Open example2a.kml in Google Earth and take the tour! Take a look at the example2a.kml source file to make sure yours matches up.
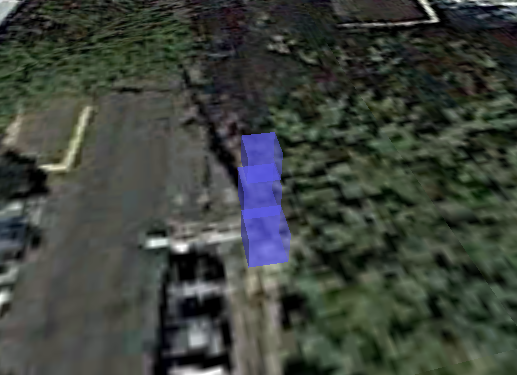
Figure 11. The beginning of the tour.
Example 3: Sync an audio file to your tour
coming soon # Roadmap - Custom labels for icons. This will probably include a label field in the attribute table that holds text. - Rotation angles for Google Earth models.
Authors, Contributors, Support
- Code Authors: Ed Farrell (@EdFarrell), Sean McGinnis (@SeanKMcGinnis), and Peter Robinett (@pr1001).
- MilkMachine was developed to support the 250 Miles Crossing Philadelphia Project (http://www.250miles.net/), featuring digital artists Esther Polak and Ivar van Bekkum (http://www.polakvanbekkum.com/).
- Support for the project came from these sources:
- University City Science Center
- Wexford Science + Technology
- Philadelphia Redevelopment Authority
- Drexel University